| Background:
This installation was performed on my 1990 NA. I purchased the
K&N kit from Stillen. The intake filter upgrade is one of the fundemental
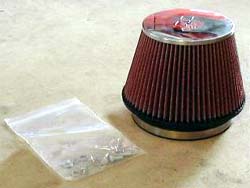
'stage' upgrades to make. Here's what's included in the filtercharger kit
(1.):
1. K&N Cone Filter
2. Adapter Ring (shown already attached to the filter)
3. Ring clamp (holds filter on adapter ring)
4. Bolts and washers
5. E.O. sticker
6. "Equipped with K&N Filtercharger" sticker!
Special Tools Needed:
Either a stubby phillips or a 18" phillips
2 plastic sandwich bags & rubberbands or 2 shop rags
Masking tape
Installation:
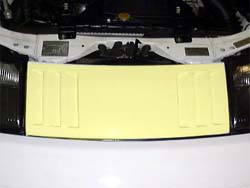
1. All of the air intake components (that we will be dealing with anyway)
are located behind the front panel. This is the panel between the headlights.
(Shown here hi-lighted in yellow. 2.) For the stock 300ZX panels,
there are four bolts (4 x 10mm) across the top. For the Stillen louvered
panel (shown) there are only two (2 x 10mm). Once the bolts are removed,
pull the panel towards the back of the car. They tend to be a little tricky
to pull out but with some (gentle) wiggling it will come loose. Once the
panel is off, I like to tape the screws to the inside of it with some masking
tape ensuring that they don't get mixed up with anything else. Also, I
wrap the panel in a soft towel so it doesn't get scratched while it's off.
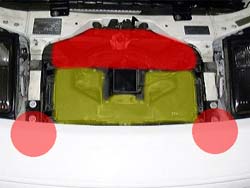
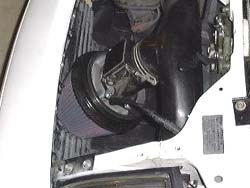
2. Once the panel is off, there are a couple parts to work with; the
T-hose (shown hi-lighted in red at the top 3.), the air flow meter,
and the airbox (shown in yellow 3.). Remove the T-hose first.
To do this, remove 3 ring clamps at the three ends of the T-hose. One of
clamps is attached to the air flow meter and the other two are attached
to the intake hoses that carry the air to the engine. Once the clamps are
off, get a good grip and bend and wiggle the T-hose to get it out. Be careful
not to put any stress on the connector and cable that are coming out of
the air flow meter. Also, do not use anything to pry the T-hose off of
the air flow meter there is a delicate screen protecting the sensor inside
it. Place the plastic bags and rubber bands over the two intake pipes going
to the engine or stuff shop rags into them to prevent any debris from getting
in there while working up front.
3. There are four bolts that hold the air flow meter to the stock air
box. These are in a square pattern. Use an extension to reach them
but they're not too tricky. Remove all four of these. There should
be enough slack to just set the meter out of the way without removing the
connector from the side.
4. Remove the cover and filters from the airbox. There are 4 clamps
that you pry up with a screwdriver. The cover then comes off and exposes
the two filters. Set these aside. There are 4 bolts & 2 screws
holding the stock airbox to the car, two bolts (2 x 10mm) at the top corners
and two (2 x 10mm) at the bottom. The two phillips screws are in
the front of the air box and hold the black plastic splashguard onto the
airbox (in the area of the two red circles 3.). They can be blindly
removed with the 18" phillips, leaving the driver's handle outside the
car & away from the airbox, using the stubby, the driver will have
to be leaned over to make room for the handle & fingers, which will
have to be against the airbox. The bottom two bolts (also in the area of
the two red circles 3.) take a lot of the time to remove. They are
under the two rails that run along the sides of the airbox and the heads
of the bolts face the back of the car. I had to use an open-end wrench
and only turn a few degrees each time. Be very patient. The final two bolts
are on the rails at the top rear of the airbox.
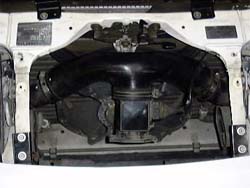
5. Remove the lower half of the airbox. I masking-taped the rear edge
of the front bumper in front of the airbox to keep from scratching the
paint on it while removing the airbox. Go about 4" deep with it. Removal
can be done without mutilating it. The going rate for stock airboxes is
low, so destroying it might be the easiest way to get it out. Otherwise
gently bend the metal part in the middle until the box can be wiggled free.
Once again, be very patient.
6. Replace the T-hose. Put the clamps loosely around the top two ends
of the T-hose. Take off the plastic sandwich bags or remove the rags and
put the two top ends of the T-hose on first. Don't tighten the clamps down
yet.
7. Bolt the air flow meter to the adapter ring provided with the kit.
Use the four bolts also provided with the kit.
8. Slip the remaining ring clamp around the bottom end of the T-hose
and attach the air flow meter to the hose. Do not tighten the clamp yet.
9. Push the screw provided with the kit through the hole in the top
of the filter. The head of the screw should be inside the filter.
Dry fit the filter to the adapter ring and mark approximately where the
screw you just pushed through touches the plastic flap below the filter.
In the 3rd ripple from the top is the common placement. Pierce a hole in
the flap with a phillips screwdriver or an awl and push the screw through.
Tighten a nylock nut (provided) down onto the screw so that the filter
is now attached to the plastic flap. This will keep the flap from
bouncing around and protects your filter from water. Now put the filter
ring clamp around the filter and fit it over the adapter ring.
10. Make sure everything is straight and that all ends of the T-hose
are connected fully and cleanly. We can't have any air leaks! When all
is set, then tighten all of the hose clamps. Make sure that the screw heads
for tightening are easily accessible for next time. Replace the front panel
and go enjoy the ride even more with your newest upgrade!
Derrick
Back to TECH |