| The stock Z32 fuel pump is good for up to 750 HP, so there
is no real need to go with aftermarket units once it breaks down. However,
the pump can go bad, especially if it has more than 80.000 miles on it.
Symptoms of pump going bad are:
- buzzing noise, under load, from the gas tank area (behind drivers
seat on a Turbo coupe)
- low fuel pressure at idle (37-38 PSI is normal)
My pump was buzzing real bad every time I was on the gas, plus engine
was stumbling and hesitating around 3000 RPM - when checked, fuel pressure
was as low as 20 PSI @ idle. A brand new Nissan OEM fuel pump is ~$220
from Courtesy Nissan.
Tools:
10mm wrench
8mm wrench
philips screwdriver
pliers
Procedure:
Note: Make sure the battery is disconnected, and you're NOT smoking!
Make sure you have a fire extinguisher close by just in case!! I'm NOT
joking!!!
1. Remove all trunk interior panels. This includes 3 rear panels, speaker
covers/side panels, and the plastic lids behind both seats (phillips and
10mm).
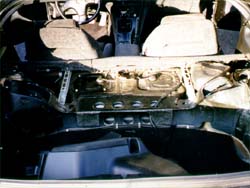
2. Remove the tray behind the seats (phillips and 10mm). This will expose
the top of the fuel pump, sitting right behind drivers seat (1.).
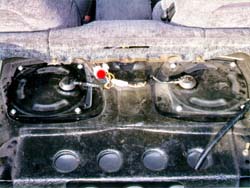
3. Disconnect both fuel pump harness connectors, they should be under
the tray (red dot in 2.). Remove the lid (4 x phillips). Carefully
move the lid to the side. Open the gas tank cap to release air pressure
in the fuel tank.
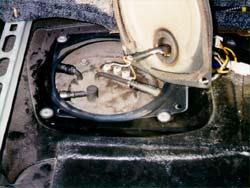
4. Remove the clamps and carefully pry off fuel hoses from the top of
the tank (3.). These hoses are pretty tough, and I used pliers (not
sharp ones) to get the old ones off, by moving them side to side. Do not
cut them, they will have to be used later. Once the hoses are loose, use
blunt object to pry them off. This part is pretty nasty and hard to do,
so be patient.
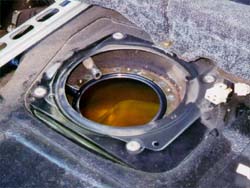
5. Remove the bolts holding the pump assembly to the tank (6 x 8mm).
Carefully wiggle the pump assembly out of the tank. Cover the exposed tank
opening with a shop towel to make sure no debris falls in (4.).
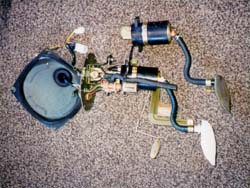
6. Remove the old pump and fasten the new one inside the bracket. This
is pretty straight forward, there are 2 brown pins on the side, and 2 power
wires, plus the pump can go in only one way. Just look at the old one,
and put the new one in the same way. Make sure to reconnect or move back
into position any parts of the assembly that might have removed/moved.
In my case I had to disconnect some kind of black tube, to access one of
the screws. Make sure all is nice and tight. (old pump on top, new one
on bottom attached to lid 5.).
7. Carefully place the pump back into the tank. Don't forget the rubber
sealant ring, it sits under the fuel pump bracket, and prevents vapor leaks.
The ring might get pinched or otherwise damaged, be careful with it. This
might be tricky, so be patient, and don't bend or break anything. Replace
the 6 8mm bolts. Reconnect all 3 fuel lines. Don't forget the clamps, they
should go on before sliding the tubes. Use some WD-40 to lubricate fuel
hoses and carefully slide them back on.
8. Connect both fuel pump harness connectors, and reconnect the battery.
Place the gas tank cap back on. Start the car while checking for any fuel/vapor
leaks from the fuel pump area. It will be hard to smell any leaks or vapors
due to the fact that fuel tank was wide open for some time, so use your
best judgment and don't blame me if something goes terribly wrong. LOL
:-)
9. If everything is right, then re-install the interior panels.
Recommended replacements at this time:
Fuel Pressure
Regulator
Fuel Damper
Fuel
Filter
Wolf [Pittsburgh]
Back
to TECH |