| 300zx Headlights and Aiming The first part of this posting answers the two most asked questions on the internet concerning 300zx Z32 headlights. One – what are those strange plastic things with suction cups I found in the back of my 300ZX and two - why are there strange glass nubs on my headlight covers? The rest of the write-up covers the question. How do I align the headlights on my 300zx? While driving my 300ZX, I thought that the low beams shined a little low on the road. I figured it would be a simple matter to adjust them. The more I got into it however the more I reaffirmed the conclusion that there is nothing simple about the 300zx. Below is more information than you ever wanted to know about the 300zx headlights. The first thing I did was to survey the internet to determine how to aim / adjust the headlights. Postings had aiming criteria all over place. Some of the articles I read implied that you adjusted the headlights by adjusting the individual lights inside the housing separately, other articles seemed to indicate that this was not the case. So which was it? It turns out that the answer depends on whether you own a 300ZX for the US and North American (NA) market or one for the rest of the world. US 300ZX Models versus the Rest of the World It turned out that most of the articles I had read on aiming the headlights on a 300ZX were from owners in Australia or the UK. The headlight mounting on US and NA cars is completely different from JDM, Australian, UK cars as well as cars sold in most of the world for that matter. The plastic housing for 300ZX headlights on non US cars is firmly mounted on two metal brackets which are in turn securely mounted inside the engine compartment. On the rear of each of these housings are 4 adjustment screws. These screws control the up and down and left and right alignment for the low and high beams within the headlight housing. The screws adjust the low and high beams separately.
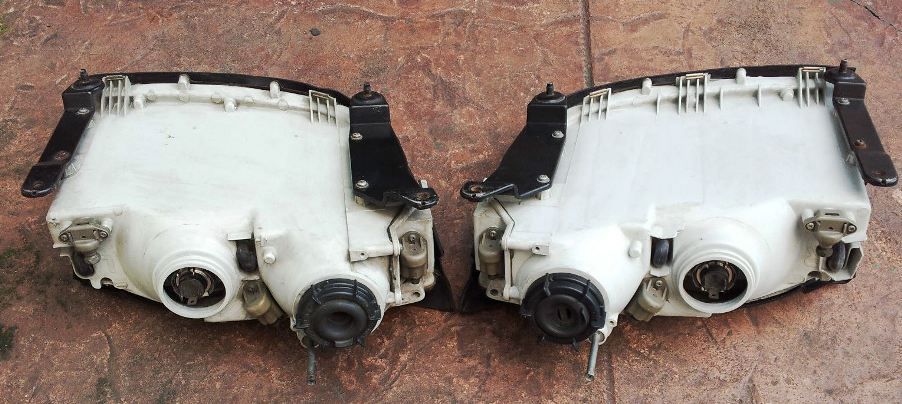
Bottom of non US 300ZX Light Housings
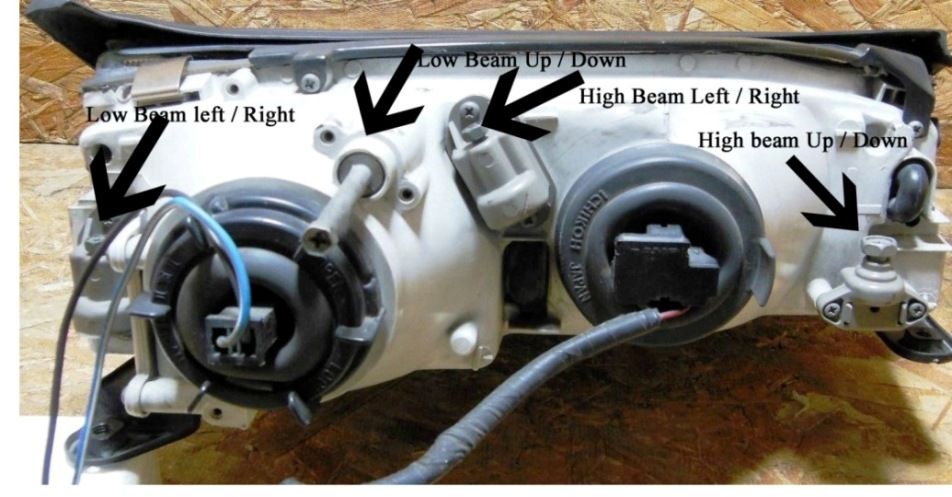
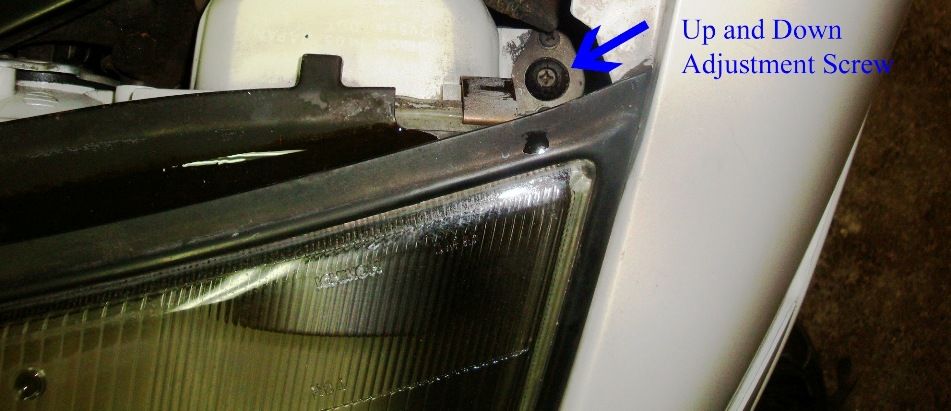
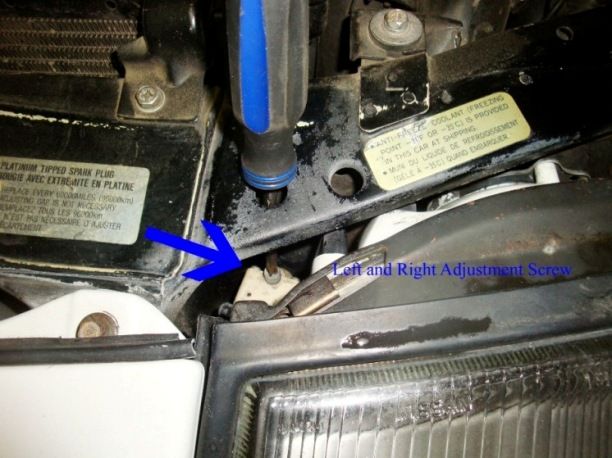
Rear of non US 300zx Light Housing Showing 4 Adjusters US cars use a completely different system. Here the plastic housing is mounted on a large metal plate. There are only 2 adjuster screws accessible and they do not move the lights inside the housing, they move the entire housing (with glass) on the plate instead. One screw effects elevation of the housing while the other effects the side to side orientation. It should be noted that there are still adjusting screws like the non US cars have present on the plastic housing but on the US housing they are not readily accessible. They are recessed in the housing and covered with epoxy so that they will not be tampered with. On US cars both the low and high beams are adjusted simultaneously.
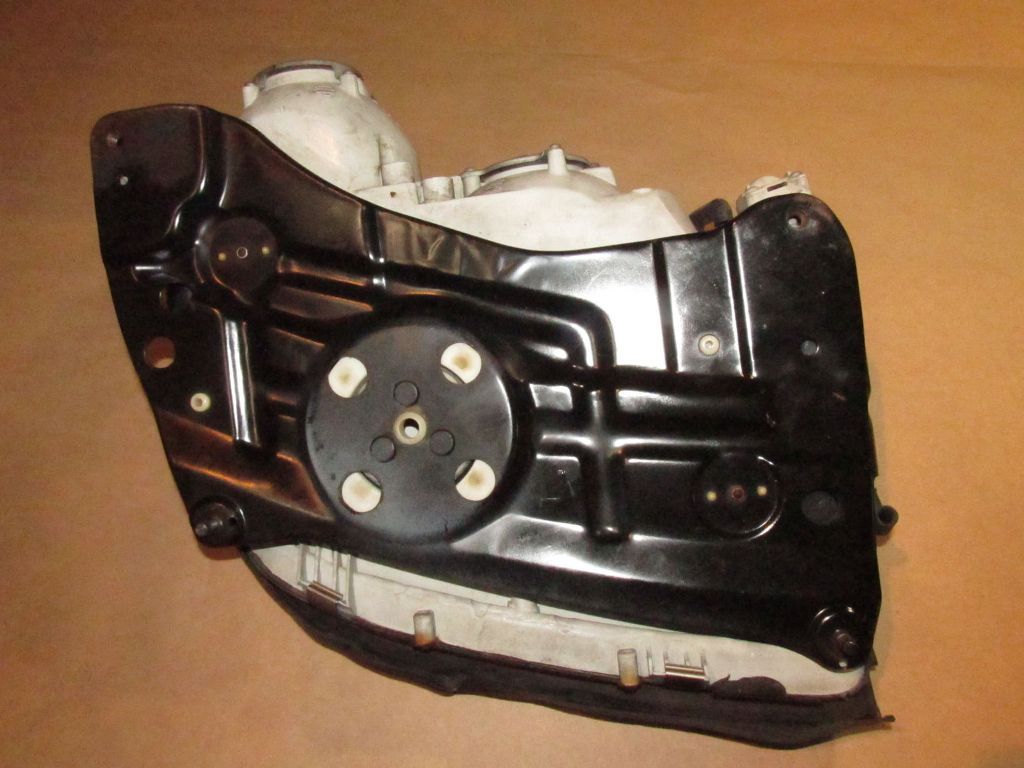 Bottom of US 300ZX Light Housing Showing Mounting Plate
![]() src="http://i9.photobucket.com/albums/a70/wmasterson1/300ZX%20Headlight/posting%204_zpsu9yqfero.jpg" border="0" alt=" photo posting 4_zpsu9yqfero.jpg"/> src="http://i9.photobucket.com/albums/a70/wmasterson1/300ZX%20Headlight/posting%204_zpsu9yqfero.jpg" border="0" alt=" photo posting 4_zpsu9yqfero.jpg"/> Rear of US 300ZX Light Housing Showing 2 Adjusters Nubs and Nipples Why do US cars use this system? To understand that you must look at the glass headlight covers with their three small extending “nubs” or “nipples”. These “nubs” have been a feature on the headlights of US cars since the 1940s. Prior to that time there was no established size, shape, or lumen output of headlights in the USA. In 1940 the US standardized criteria for headlights of cars sold in the USA. The headlights would all be a standard size: 7” round. They would be sealed beam type (no access to the filament bulb) and they would be dual filament containing both a low beam and a high beam. This arrangement lasted until car model year 1958 when “dual headlights” became a styling fashion exercise for US cars. Instead of two 7” round headlights you could have four 5.75” headlights instead, with the low and high beams being in separate fixtures. In the 1975 this standard was enlarged further to include square headlights of two different sizes. So now there were four different sized sealed beam headlights that manufacturers could utilize in their designs. To my knowledge, all of them had the glass “nubs” on them. In the mid 1980’s manufacturers started getting free reign to incorporate different designs and eventually to utilize headlight fixtures that contained removable bulbs of various types and curved lenses made from glass or plastic. This was done at the request of the car companies. They claimed that they could make more aerodynamic shapes which would improve fuel mileage if only the regulations would be changed. The “nubs” started disappearing from headlights and today are all ancient history.
These “nubs” on old school headlights had but one purpose and that was to aid in headlight alignment utilizing various mechanical devices. Their official name is not “nub” by the way but rather “Adjustment Mounting Pad”. The plastic devices found in a back storage space in the 300zx are specifically there to mount on the glass headlight housing surface and align with these “nubs”. This in turn allows the use of the Hoppy Headlight Aligning Tool model B4A which mounts to these adapters. The Hoppy tool was made by the Hopkins Manufacturing Co. They made a number of alignment kits over the years including the Lev-L-Lite which was a forerunner of the B4A, but only the B4A fits the Nissan adapter. You have probably never heard of this tool but it was used by service stations for 50 years to align headlights. It was even used by automobile manufacturers on their assembly lines and Ford, GM and Chrysler even sold rebadged versions of the Hoppy aligners under their own brand names. You can still find B4As used on eBay for under $100. You can easily tell the B4A from earlier versions by the fact that each B4A has three white knobs on them. The earlier versions only had two knobs. The third knob allows internal compensation on the aimer for a shop floor that is not perfectly level through a calibration technique. The Hoppy usually cam in a kit containing adapters for various headlight sizes. Obviously 300ZX (Z32) owners would not need any of them for the 300ZX since they came with its own adapters. They stopped making the Hoppys some time ago (although new old stock may still be floating around) when headlights no longer came with mounting “nubs”, came in hundreds of different shapes and sizes (which would have required hundreds of different adapters) and had the light adjusted internally instead of with the entire light housing thereby ruling out the use of mechanical adjusting devices.
The Hoppy B4A is a strictly mechanical device and the up or down alignment is made by using a built in bubble level on its top side (when mounted horizontally). The B4A is placed directly against the headlight housing via an adapter. You adjust the vertical orientation of the headlight until the bubble shows the light fixture to be level. This would put the light beam straight out at the same height of the headlight from the ground. The Hoppy also measures side to side alignment utilizing a second Hoppy device. With two Hoppy devices you can set the headlights parallel to each other. Both tools have internal mirrors and aligning stripes for this purpose. I won’t go into detail about the use of a Hoppy because there is an excellent video on YouTube by “Eric The Car Guy” showing how to use them. https://www.ericthecarguy.com/body-videos/982-how-to-aim-headlights-with-hoppy-aimers If you are curious about them you can also download a copy of the instruction manual for the B4A at: [ http://secure.hmswarehouse.com/TECH/hoppy/HP1003B.pdf ] Not discussed in Eric the Car Guy’s video or the downloadable Hoppy instruction manual, is the situation when you want to use the Hoppy but end up with lights that are aimed a few inches down from the height of the headlight and to the right of vertical. If you align the US 300zx headlights with the Hoppy and the horizontal and vertical knobs set to zero, you will end up with the light aimed directly ahead in the horizontal and vertical direction. This would be all right for the high beam but it could be a little too high and to the left for the low beam under some specifications. You can compensate for this by using the horizontal and vertical knobs on the Hoppy. The numbers on the Hoppy approximate inches at 25’. Setting the vertical knob to a negative four and then adjusting the up and down screw on the light to center the bubble in the level would put the beam on a negative .76 degree angle and put the center of the low beam 4 inches below the height of the of the headlights when shining on a wall at 25’. The beams could be adjusted right or left by using the same procedure with the horizontal knob. Note that in one video I saw on the internet concerning how to operate the Hoppy (not Eric’s) the demonstrator in the video referred to the numbers on the Hoppy as representing degrees. This is absolutely incorrect. One -an earlier guide to the Lev-L-Lite referred to the numbers as representing inches and the H4A uses similar internals except for the floor compensation aspect. Two – using a second bubble level marked in degrees, I put it on top of the hoppy. I then turned the vertical (up and down knob) on the hoppy to the 4 position and centered the bubble in the Hoppy’s level. The second bubble level registered a movement of less than 1 degree. (4” down represents a .76 degree downward angle at 25’). If the 4 had meant degrees the second bubble level would have gone all the way to 4 degrees. The plastic headlight aiming adapters that came with the 300ZX are made to be positioned on the “nubs” of the headlight glass and are held in place by their suction cups. The B4A is then mounted to these adapters and held in place by its suction cup against a plastic vertical plate inside the 300ZX adapter.
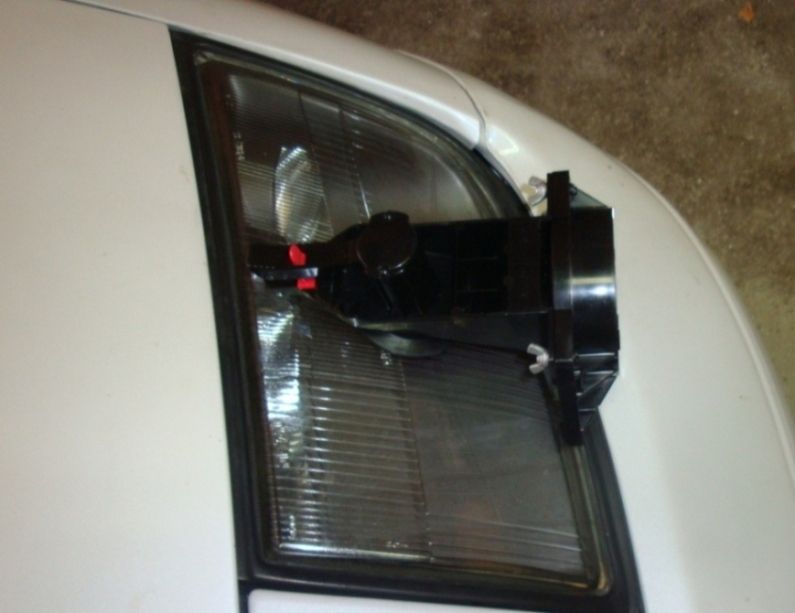
Nissan Aimers Mounted to Headlight
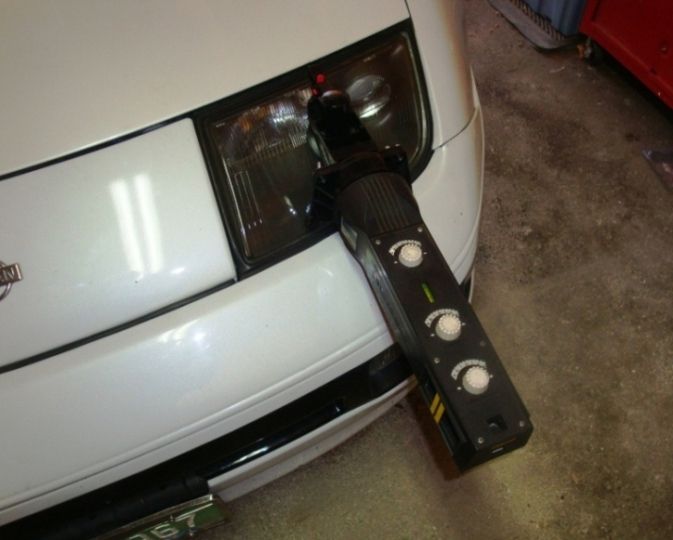 Hoppy Mounted to Nissan Adapter
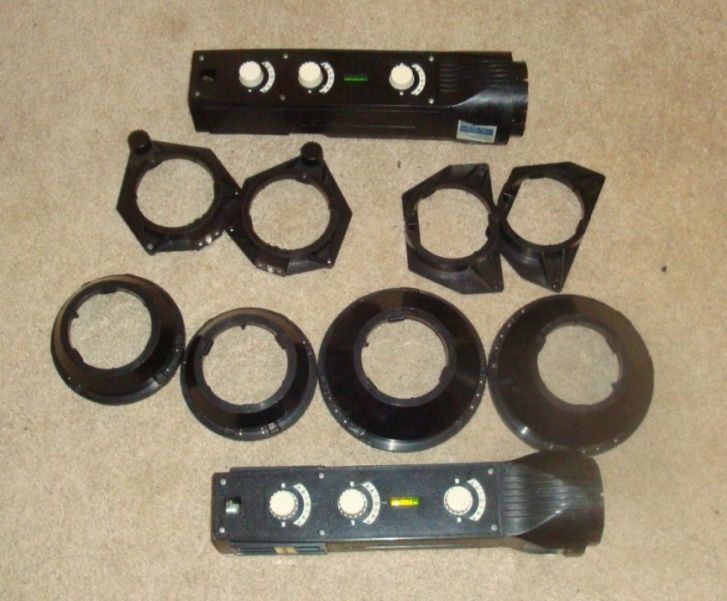 Hoppy B4A Kit 300ZX Headlight Alignment Considerations
Most 300zx owners as well as shade tree mechanics are not going to have access to even a Hoppy tool let alone a photo electric or laser alignment tool with which to aim their headlights. For these folks there are a couple of options. The first is the tried and true old school method of shining the lights on the back of a barn or other convenient wall. Since the US version of the 300ZX adjusts the low and high beams together, it would be impossible (without removing the epoxy covering the adjuster screws and fiddling around with them) to have both the high and low beams adjusted to the optimized (nominal) values of the specifications. Using the 4" tolerances however, you may be able to get both into an acceptable condition. The thing to remember however is that the adjustment of the lower beam is the critical adjustment. In fact the 300ZX FSM does not even discuss the high beam. The advice that used to be given to people that had 7" sealed beam headlights containing both a low and high beam was to adjust the light to the low beam setting and forget about the high beam. It is good to remember that:
1. If you turn on either bulb and they are way off, it probably means that the light does not have maladjustment but rather a mechanical problem. When the bulb was last replaced it may not have been seated properly and ended up installed at an angle or was damaged during installation. Another reason might be that the housing enclosure itself is broken or the mounting plate is bent. In any case repair or replacement of the affected part would be called for. Attempted alignment would not fix these problems. 2. The high beam is only supposed to be used when no traffic is approaching and therefore the light pattern is not as complex, nor the alignment as critical, as the low beam. 3. The low beam is the critical adjustment here since it has a distinct light pattern which must be aligned properly to enable the driver to see where they are going, illuminate road signs, bicycle riders, pedestrians and other objects on the shoulder of the road and all without blinding or dazzling on-coming drivers on the opposite side of the road. 4. The high beams should not even be inspected by states or service facilities in the configuration of the 300ZX Headlights. Quoted from State of Virginia Statute 19VAC30-70-140e Headlights: “NOTE: Always inspect the following sealed beam and replaceable bulb and integral beam headlamps on LOW BEAM only:
- 5-3/4 inch, marked 2, 2C, or 2C1 - 7 inch, marked 2, 2D, or 2D1 - 100 X 165mm rectangular, marked 2A, 2A1, or 2E1, 2G1 or 2H1 - 200 X 142mm rectangular, marked 2B or 2B1 - Replaceable bulb headlamp, marked LF with 9004 (HB1) - 92 X 160mm rectangular, marked LF - Replaceable bulb headlamps with 9006 (HB4) alone or in combination with 9005 (HB3) - 55 X 135mm rectangular, marked L - Integral beam headlamp when high and low beam reflectors move together.” The 300ZX falls into category 7, it has replaceable bulbs 9006 (low beams) and 9005 (high beams). The complete statute can be viewed here: [ http://lis.virginia.gov/cgi-bin/legp604.exe?000+reg+19VAC30-70-140 ]
Really Old School Aiming Headlights on the Wall Approach
Under the headlights on the wall approach you need to make a grid on the wall using tape. Up to Five vertical pieces of tape can be used to mark the center of each headlight as well as where the center of the car would be if it were pressed up against the wall. The next step in the wall alignment processes to place a Horizontal tape line on the wall as well. To position this line, a measurement is taken from the ground in front of the car to the midpoint of the light being inspected. Since the 300zx low and high beams are side by side the measurement would be the same for each of them. This measurement is used to position the horizontal tape on the wall at this same height while intersecting the vertical pieces of tape. The standard procedure is then to back up the car 25’ (over flat ground) and then see where the turned on lights illuminate the tape. The light of one light would be blocked off while adjusting the other. (Do not drape anything over the headlight though, it can overheat and melt or warp the plastic housing). A large piece of cardboard or other object a foot or so away should do. The adjustments are made with the two adjusting screws until the light beams come into spec.
 The diagram below is from the EL section of a 300zx FSM for US cars. It shows a car positioned 25’ from a wall. The diagram also shows two vertical lines for the two low beams and the horizontal line. There is no diagram for the high beam since it cannot be adjusted separately on US cars. The lights are aimed at the two + points where the horizontal line intersects the vertical lines. The diagram indicates a plus or minus 4” tolerance in either the vertical or horizontal direction for the top EDGE and left EDGE of the high intensity portion of the light beam.
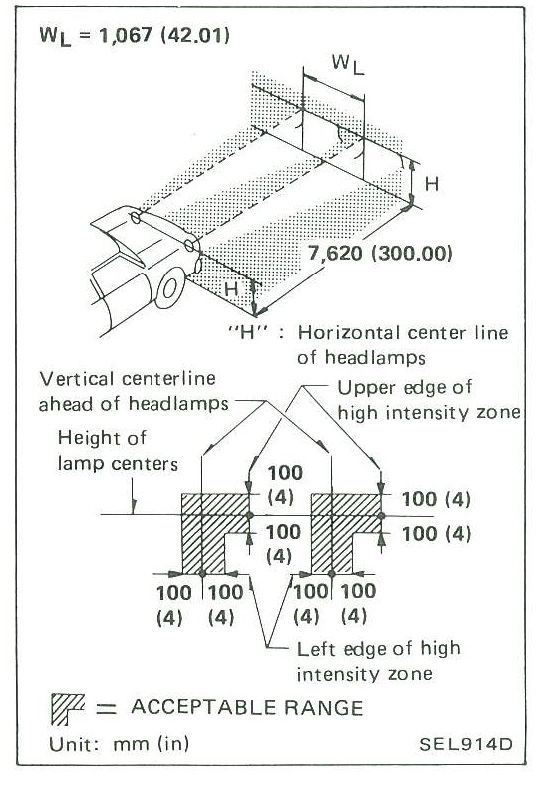 Diagram From 300zx FSM Section EL The FSM calls for making the adjustments with the car having a full tank of gas, having tires correctly inflated, having no temporary objects in the car (tool boxes, golf clubs etc.) and with the weight of a driver on the driver’s seat. The standard weight to simulate a driver is 160 pounds. You might want to use your own weight. The purpose of this task is to end up with a properly aligned car while driving it in a typical fashion. I also looked at a couple of State headlight aiming inspection standards as well as the Society of Automotive Engineers (SAE) standards and Department of Transportation (DoT) regulations. Some of these standards change the description of the headlight beam when talking about low and high beams. It is easy to become confused. When discussing the high beam they talk about the CENTER of the high intensity part of the beam. When talking about the low beam they talk about the EDGE of the high intensity part of the beam, specifically the top and left edge. So when aiming the high beam on a screen (on cars that have separate adjustable high beams, not the 300ZX) they want the CENTER of the high intensity part of the beam centered on the intersection of the horizontal and vertical lines. When they talk about the low beam they typically want the top EDGE of the high intensity part of the beam on the horizontal line (not the center of the beam) and the left EDGE of high intensity beam on the vertical line. There is a plus or minus 4" tolerance in all directions. This would put the center of the high intensity beam several inches below the horizontal line and several inches to the right of the vertical line for the low beams. For further clarification, I turned to the state of California. I figured if anyone was going to be a stickler for automobile inspection criteria it would be California. The inspection criteria California is published by the California Bureau of Automobile Repair (BAR), and is called the Handbook for Light Adjusting Stations, dated May 2015. The document can be viewed below at: https://www.bar.ca.gov/pdf/Lamp_Handbook_9.3.15.pdf One of the diagrams (figure 9) in the Handbook matches the Nissan specifications but goes into far more detail. I quote from the BAR handbook:
“Vehicle headlights shall be adjusted in accordance with the Society of Automotive Engineers (SAE) Lighting Inspection Code, J599, and SAE Performance Requirements for Motor Vehicles, J1383, or the most current SAE standard. SAE J581 describes auxiliary driving lamps; front fog lamps are covered by SAE J583. High Beam Lamps - The correct mechanical aim for high beam headlamps at 25 feet is 0 vertical and 0 horizontal. The mechanical inspection limits for high-beam headlamps shall be 10 cm (4 in) up to 10 cm (4 in) down and 10 cm (4 in) left to 10 (4 in) right. Low Beam Lamps - The mechanical aim inspection limits for the low-beam headlamp or the low beam of dual beam headlamps at 25' shall be 10 cm (4 in) left to 10 cm (4 in) right. The vertical inspection limits are based upon the height of the vertical center of the headlamp from the ground as noted in the chart below. Vertical Beam Aim Guidelines - Low Beam The nominal vertical aim position on lower beam headlamps shall be adjusted based upon the headlamp mounting height, from the ground to the light source center of the headlamp, per the chart below.
Headlamp (centerline) Nominal Aim Inspection limits Headlight Mounting Height Nominal Vertical Aim Aim Inspection Limits
22 to 36 Inches 0" Vertical 4" up, 4" down (56 to 90 cm) (10 cm up, 10 cm down) 36" to 48" 2" down 2" up, 6" down (90 to 120 cm) (5 cm) (5 cm to 15 cm) 48" to 54" 4" down 1.5" up to 6.5" down (120 to 140 cm) (6.4 cm) (4 cm to 16.5 cm)” The 300zx falls into the first category cars with lights mounted 22” to 36” so the upper EDGE of the high intensity part of the beam would be aimed at the horizontal line. Note that all specifications refer to “mechanical aim”. This means using a Hoppy or other mechanical aiming device.
The three illustrations below were taken from the California BAR Handbook
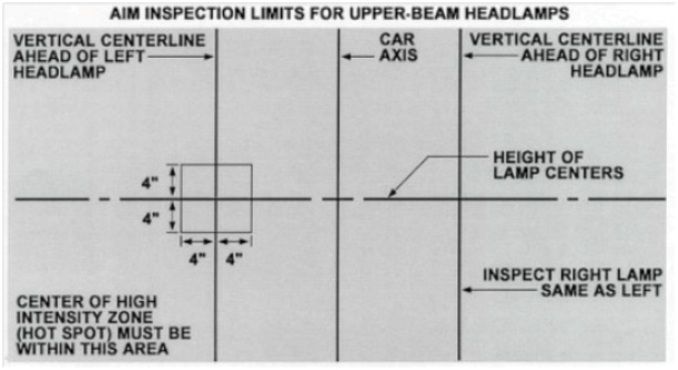 Figure 7 from BAR Handbook
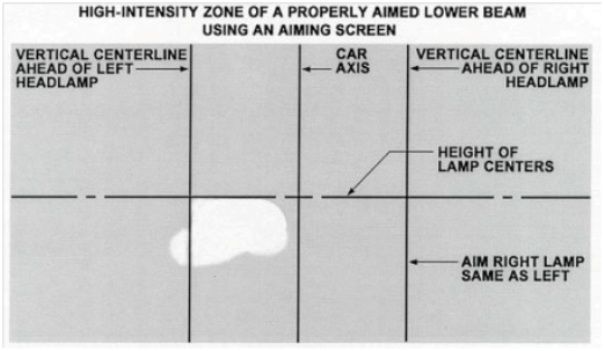 Figure 8 from BAR Handbook
 Figure 9 from BAR Handbook Interesting, the California Handbook lists acceptable inspection equipment that can be used by inspection stations. It still lists the Hoppy Alignment tools as acceptable. They are listed as Hopkins Alignment Tools, referring to the name of the manufacturer. If you are interested in the criteria for fog light alignment, the handbook indicates that the top of the light beam hitting the wall from 25’ should be 4”below the horizontal tape you made on the wall for the height of the fog light. It should be centered on the vertical line with a plus or minus 4” tolerance. The SAE J599 specification for headlights can be viewed here:
https://law.resource.org/pub/us/cfr/ibr/005/sae.j599.1997.pdf
Light Output of USA 300ZX bulbs
The USA 300zx uses a 55 watt halogen 9006 / HB4 bulb in the low beam which puts out 1000 lumens and a 65 watt halogen 9005/HB3 bulb in the high beam which puts out 1700 lumens. Both of these lumen rating assume clear bulbs. If you use one of the bulbs completely covered in blue tinting in order to mimic a xenon HID bulb, you will be putting out fewer lumens. The lumen output of the bulbs is set by the DoT. For a through and expert discussion of headlight bulbs, output, tinting, light illumination pattern and information relating to the legal regulations pertaining to automobile lighting, refer to the Daniel Stern Lighting site. [ http://www.danielsternlighting.com/home.html ]
Current US headlight types
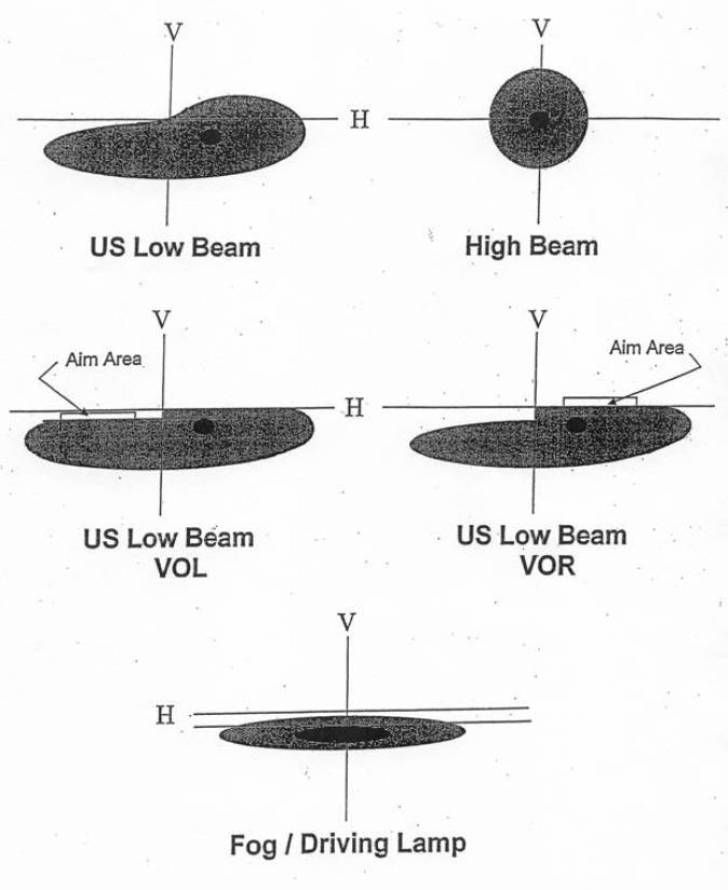
The US currently uses a number of categories to classify headlights. There is the standard Department of Transportation (DoT) approved type, which is the older type sealed beam or other type with the “nubs” or mounting pads on them and then there are the newer DoT approved Visually Optical (VO) lights. There are Visually Optical Right (VOR) and Visually Optical Left (VOL) types. These are all marked on the headlight itself. The older DoT type which includes the headlights on the 300ZX, are considered a “mechanically adjustable” type. To adjust these you use the Hoppy or other mechanical adjusting tool (although you can use an aiming screen as well). The VOL and VOR types are considered a visually-aimable type and they do not use a mechanical inspection tool but a screen or photoelectric inspection tool instead. The VOL and VOR headlights put out a different light pattern on low beam than the older DoT types. They have distinct beam cut off point to the left that lowers the beam on the left side of the middle of the car. The VOL type puts out a slightly different pattern than a VOR and the VOL’s light pattern is similar to the European ECE specification (E) light. Xenon HID lights in the US are usually VOL. Since the HID headlights are so much brighter than the standard headlight, the beam cut off pattern for them is especially necessary to help ensure that the drivers of oncoming cars are not blinded or dazzled by the light. When these lights are measured on a screen they are set so that the left side of their beam is a few inches below the horizontal plane of the height of the headlight. Again this is done to prevent blinding the drivers of oncoming cars. An HID Headlight of 37 watts can put our over 3000 lumens as opposed to the 9006 55 watt 300zx bulb which puts out 1000 lumens. The diagram below is from the State of Virginia Statute 19VAC30-70-140 Headlights (except motorcycle). It can be found at: [ http://leg5.state.va.us/images/399718294258VSPRE_files/image001.jpg ]
300zx JDM Xenon (HID) Headlights
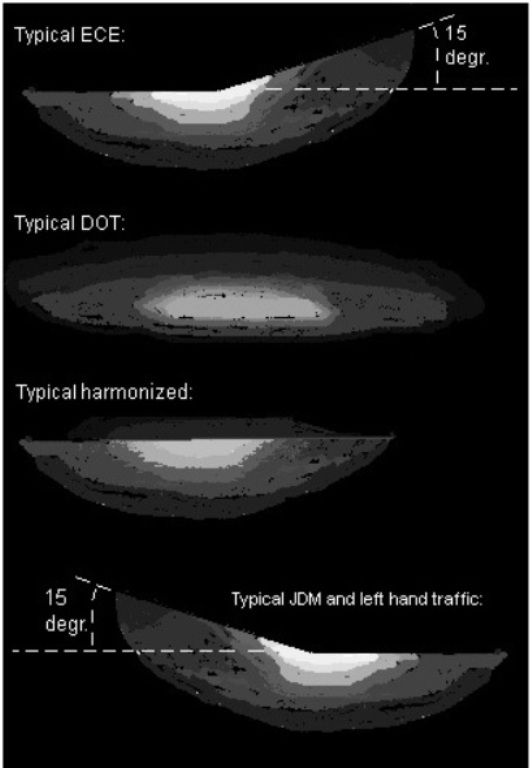
Here I should mention 300zx JDM HID headlights. In the final year (1999) of 300zx production in Japan, the cars were offered with HID Xenon headlights. It is tempting here in the US to buy these headlights from NISMO or a Nissan dealer offering JDM parts and install them into a US car. I caution against using these or any headlights from the UK, Australia, or any other country that drives on the left side of the road in your US car. The “E” type lights found in the European lights have a 15 degree kick up in their beams to illuminate the shoulder side of the road to illuminate road for signs, pedestrians, bicyclists etc. and reduced aiming on the non shoulder side. On cars from left road driving countries the kick up to the shoulder of the road would be on the left side instead of the right side as in the USA. The low beam cut offs points will also be opposite from right side of the road countries. When these lights are installed in US cars they will have the brightest and longest illuminated side of the light pattern facing on-coming traffic and given their higher light output are almost sure to dazzle the on-coming drivers.
The diagram below and a discussion of the differences of DoT, JDM and European light patterns can be found at: [ http://www.ratwell.com/mirror/faq.auto.light.tripod.com/hl-systems.htm ]
Headlight Alignment Using Light Meters
There are other economical methods to use besides the lights on the wall approach. These use hand held light meters.
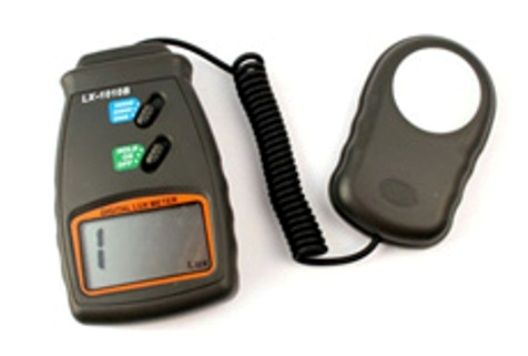
You can turn some cell phones into light meters and then use them to align headlights. The YouTube video at the following link shows how. https://www.youtube.com/watch?v=1M_xLuw82Ic Here you place a measuring device (like a yard stick in front of the light) and then run the cell phone / light meter up and down it to see at what inch mark on the yard stick the maximum number lumens occurs. This would be the center of the beam in the vertical direction. You could then move the device side to side as well to find the highest point of illumination in the horizontal direction as well, although if the yard stick is centered in front of the light, this should be the same spot. In any case, the point at which the lumen reading is maximized in the vertical and horizontal is the center of the light beam. You would then use the adjusting screws to bring this point into spec. For those without a cell phone that has the necessary sensor (and necessary downloaded app), don’t despair. You can go on eBay and buy a meter that measures light output in lux for about $16.00.
 You would then use the same technique described in the cell phone video to carry out the adjustments.
Conclusion
Headlights turned out to be a far more complex subject than I ever imagined it would be when I first started looking into how to aim my 300ZX headlights. The problem with my initial search of the internet was that many of the light patterns shown and instructions for aiming were for European cars or US cars with VOR or VOL type lights. Even with ordinary DoT headlights the aiming write up could be coming from someone whose vehicle has lights mounted higher than 36” and therefore have different aiming criteria than a 300ZX. Additionally while the inspection criteria varies among the states, for most states (which do inspect headlight aim) are based upon SAE Lighting Inspection Code, J599, they can vary in detail and description concerning the proper aim of headlights. I looked at a couple of manufacturers service manuals and found even here significant differences in how they recommended the headlights be aimed as well. Some have light beams at or slightly below the horizontal line at the height of the headlights while others have the beam aimed 5” to 7” below the horizontal line and to the right of vertical line. It should be noted that the minimum height for headlights in the US is 22” and that is just about the center of the 300ZX lights from the ground. Since the vertical aim of the headlights takes into account the height of the headlight and 300zx headlights are mounted as low as you can go, you can probably get away with aiming them straight out at the horizontal line on the wall since headlights that low are less likely to dazzle oncoming drivers. Certainly a “friendly” setting for the 300ZX headlights would be to aim the central part of the low beams 3” to 4” below the horizontal line and 3” to 4” to the right of the vertical line at 25’ from a wall.
Like many subjects, with headlights the more you look into them, the more you will find.
I hope that you have found the discussion of 300zx headlights of some interest. I have posted a couple of other discussions concerning the trials and tribulations that I have encountered while owning a 300zx. You may find these of some interest as well. Enjoy the Ride
|


 src="http://i9.photobucket.com/albums/a70/wmasterson1/300ZX%20Headlight/posting%204_zpsu9yqfero.jpg" border="0" alt=" photo posting 4_zpsu9yqfero.jpg"/>


 300zx Headlights and Aiming with wall or Hoppy -
  16:39:22 10/17/16