| Following is a procedure to replace and install the Power Steering (PS) Pump on a 1990 - 1993 Twin Turbo 300ZX. The procedure will also work on an N/A and Twin Turbo's from 1994 -1996 but will be easier and quicker because you will not have to deal with the HICAS hoses or intercooler piping. Tools/Parts Needed:
- Sockets: 8mm, 10mm deep, 12mm, 14 mm, 19mm, 24mm, 27mm
- 3/8" ratchet (for use with 8mm and 10mm sockets in small spaces)
- 1/2" ratchet
- 6" 1/2" extension (for use in loosening sway bar bolts)
- 3" socket extension (not absolutely needed, but helps for use with 27 mm socket on crank pulley)
- 1/2" Torque wrench (from 21lbs. up to 100lbs.)
- 12mm wrench (ratcheting wrench recommended)
- 18" Pry bar (used to walk PS belt on/off)
- Long needle nose pliers (removing hose clamps and suction hose)
- Medium flat head screwdriver
- Medium Phillips head screwdriver
- Oil drain pan or some other container to catch ps and radiator fluid
- ~12" short piece of twine
- Several rags and towels on hand
- Engine degreaser or other cleaner of your choice
- Small detail brushes
- Roll of paper towels
- Floor jack
- Two 2" x 8" at least 18" long (for driving the front tires on to elevate the car so the floor jack can get under it from the front)
- Jack stands (2)
- A fixed light source or two
- 4 or 5 pairs of disposable Latex gloves
- 1 quart of ATF Dexron Type III automatic transmission fluid
- 1/2 gallon of distilled water and 1/2 gallon of antifreeze
- 2 to 4 large copper crush washers (Part #49726-Y0100) two (2) for the high pressure hose and two (2) for the HICAS hose if you have a 90 - 93 TT
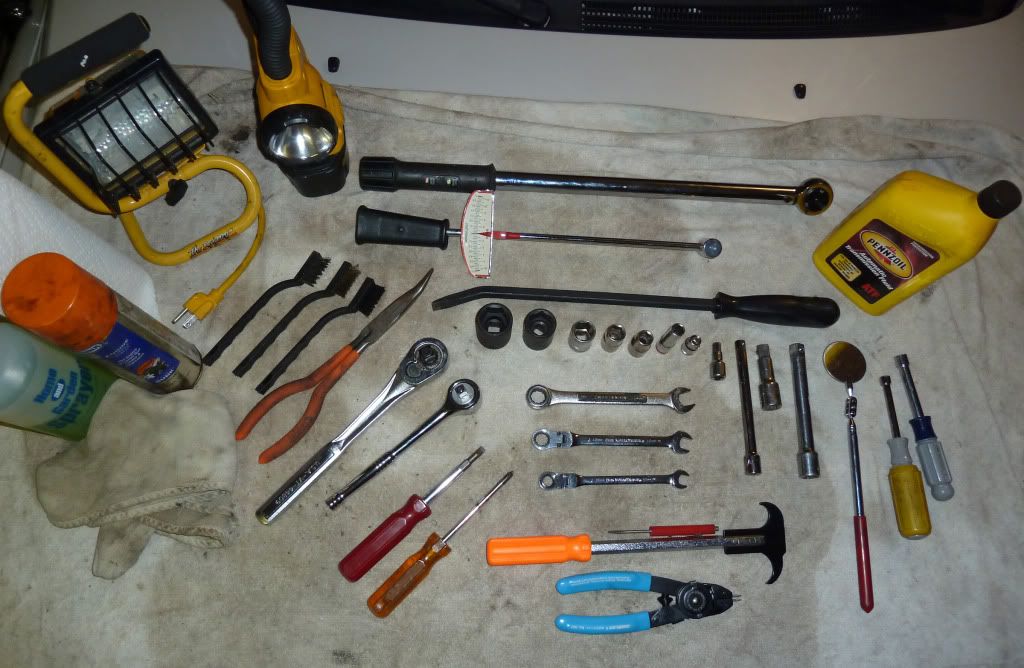
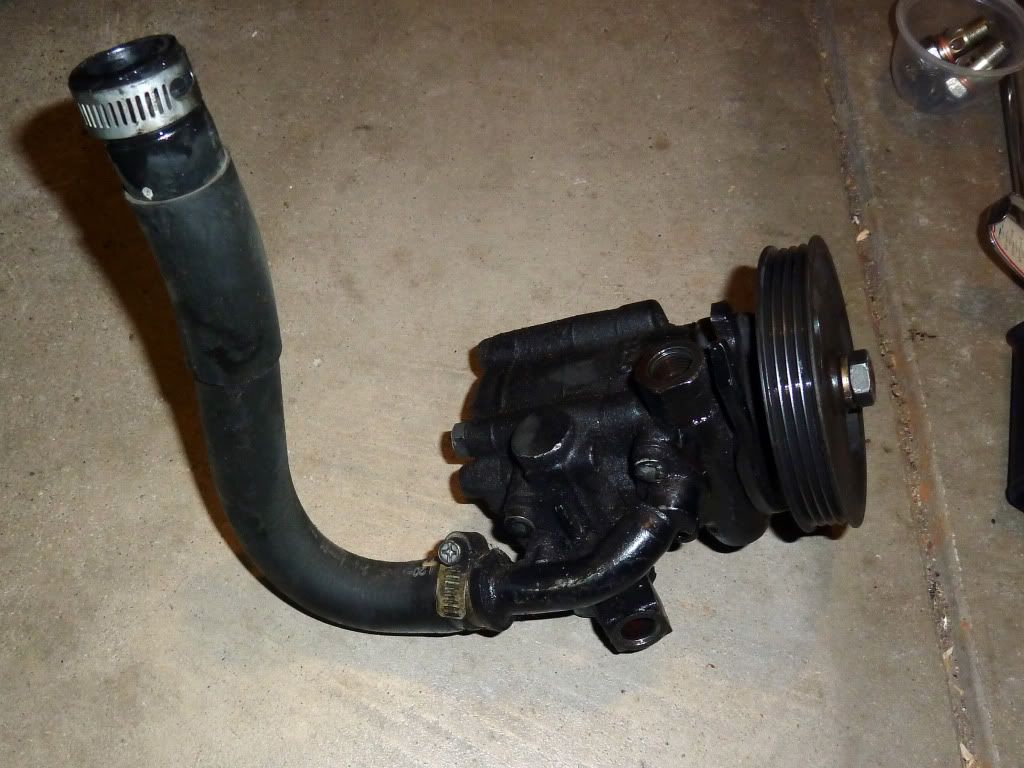
- New or remanufactured PS pump or pump rebuild kit to rebuild your own Here's a pic of most of this stuff. :-)
[pic 383]
 or if rebuilding your own pump which is what I did, you will also need a seal puller, small screw driver or pick set, and snap ring pliers, and the following parts: PS pump rebuild seal kit (part # 49591-63u25 for TT 90 - 93), (part # 49591-63u26 for NA and TT's 94 - 96)
PS shaft seal kit (part # 49119-03u25)
Optional: Pump driveshaft with new bearing, approximately $50 (in 2012)
Option #2: New bearing to replace existing bearing on your driveshaft. The old bearing will need to be pressed off and the new bearing pressed on at a machine shop. I went this route and used an NTN replacement bearing part #6202LLBC3/EM, 6202LLBC3/L627. Optional Tools:
- 12" extension (for use in loosening/tightening high pressure hose to pump. Allows more room to fully turn ratchet than 6" extension)
- 8mm and 10 mm nut drivers
- Smaller 3/8" torque wrench for the lower lbs. bolts
- Breaker bar for loosening pump hoses
- Rubber mallet Estimated Time to do job:
6 - 8 hours including thorough cleaning time your first time. (may be quicker now that you have these handy instructions. :-) but will still take a while). Be advised that this is a very dirty, tedious job which requires patience. There are several points in the project that require finagling, wiggling, pushing, pulling to get things to fit. Inevitably it will not on the first try. It can be frustrating. To reduce this, don't be in a rush and break the job into two parts over two days. A full half day for removal and cleaning, the next half day for installation. If you are rebuilding your own pump for the first time, throw in another half day for good measure. Removing the Power Steering Pump:
1. Drive your car up on the pieces of wood or similar elevation. This is to allow room for sliding the floor jack under the car from the front without hitting the spoiler. Put the parking brake ON and put the car in NEUTRAL. This is to allow the crank bolt to move freely when you turn it later on. 2. Jack the car up and put the front on jack stands. 3. Remove the large passenger side intake hose(s), the small vacuum hose attached to the accordion intercooler hose, the medium vacuum hose attached to the nipple on the intercooler hard pipe near the radiator. There is also another small hose that connects to a nipple next to other hard pipe from the intercooler. I find it easier to simply slide the other end off its balance tube connection point and flip it out of the way instead of messing with the nipple end hose clamp. If you need to, put tape on the ends of the smaller hoses to remind you to hook them back up later. It's a good idea to stuff rags in the openings of the larger pipes to prevent anything from falling in them.
[pic 301]
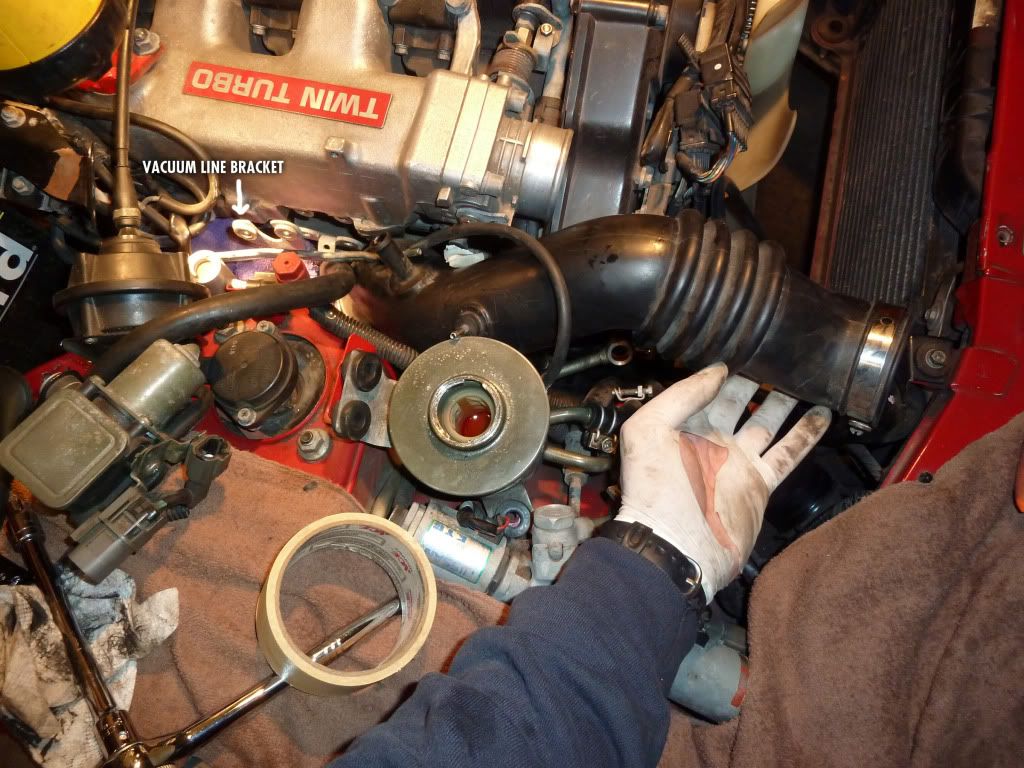
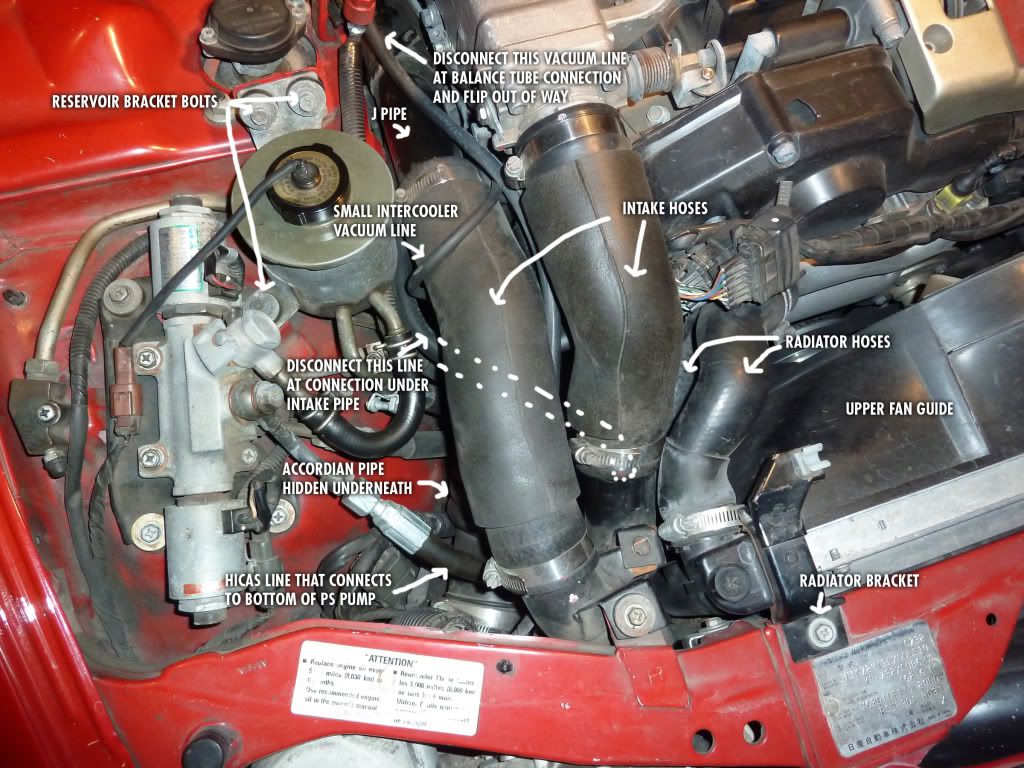 If you have a TT you will also need to remove the large plastic intercooler accordion hose and the turbo "J pipe". To remove the accordion hose, remove the PS reservoir bracket bolts (10mm x 3). This will allow the reservoir to move a little to allow the accordion hose to squeeze through. Then slide off the short fat plenum vacuum hose near the throttle body, loosen hose clamps on both ends (8mm x 2) of accordion hose. Then compress accordion end of hose while pulling rearward and up to free the front end first. Wiggle and twist until you get the hose out. Note, the pic below was taken when I was re-installing the hose but it shows the angle of the hose and which end to disconnect first.
[pic 360]
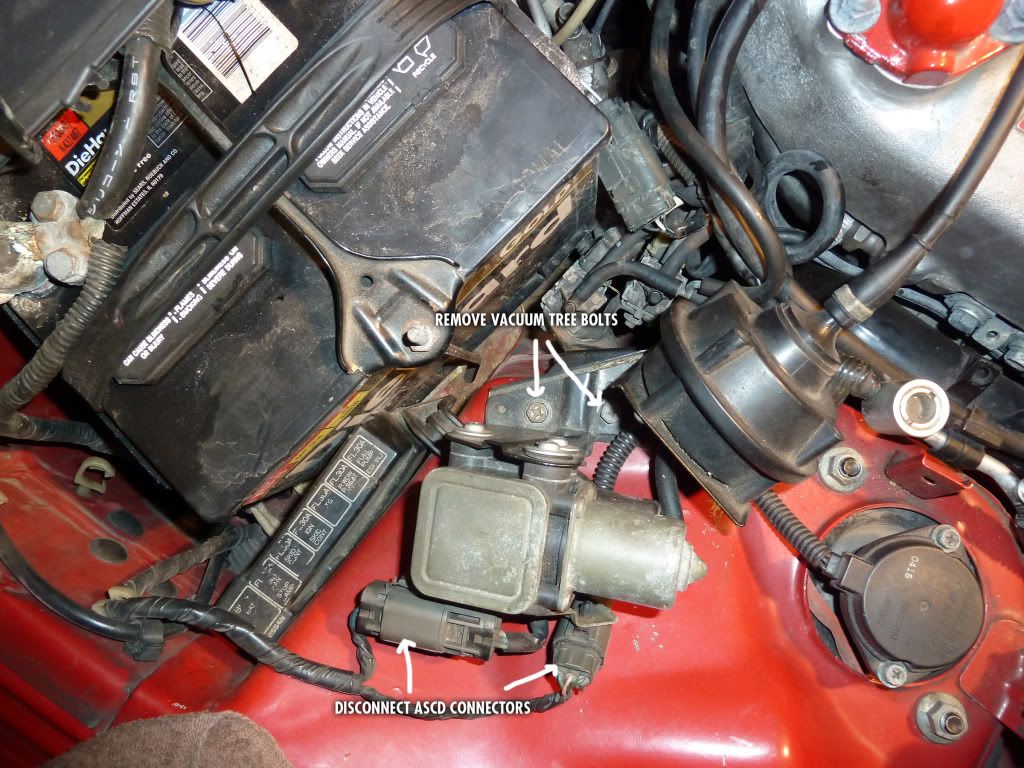
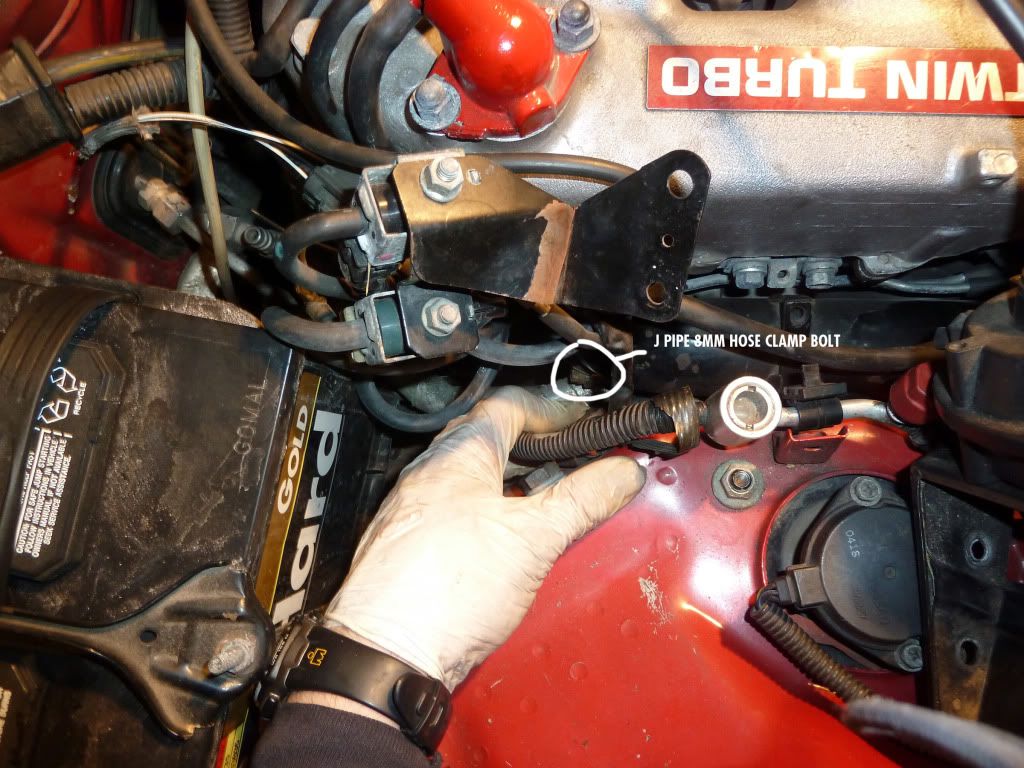
 To easily access the 8mm "J pipe" hose clamp you will need to remove the vacuum tree and ASCD bracket bolts (10mm x 2), and disconnect the two electrical connectors on the ASCD. Flip the ASCD and vacuum tree out of the way so you can see the hose clamp on the "J pipe."
[pic 314]
[pic 320]
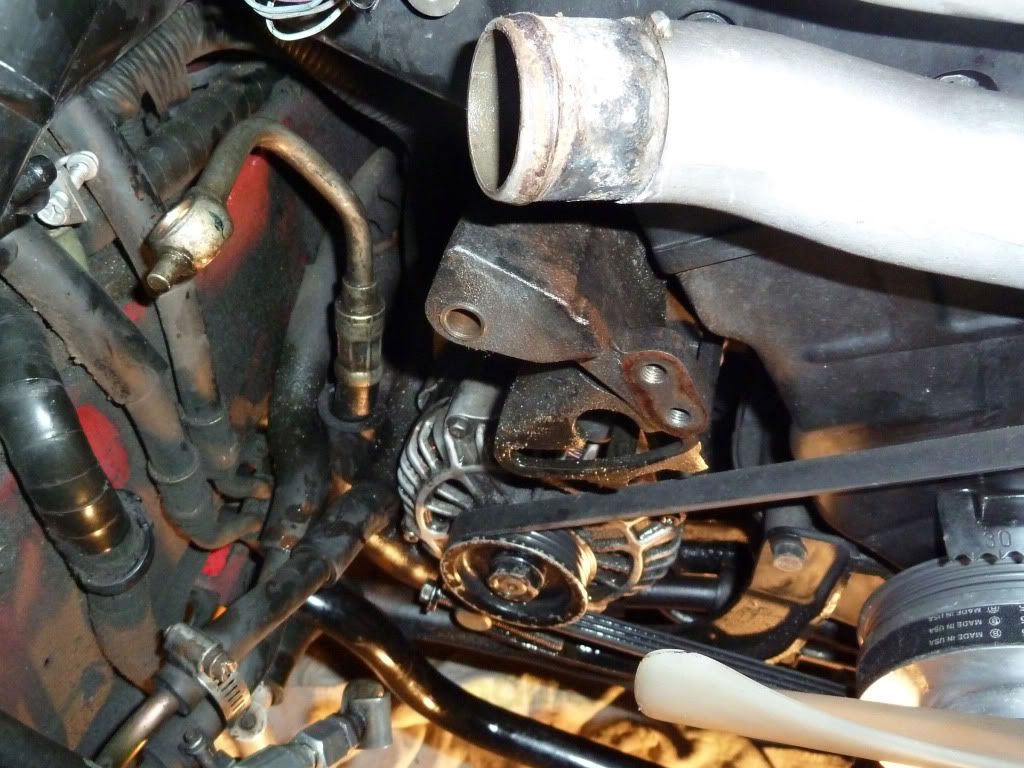
Once you have all these hoses removed you will be able to see the power steering pump, sitting above the alternator.
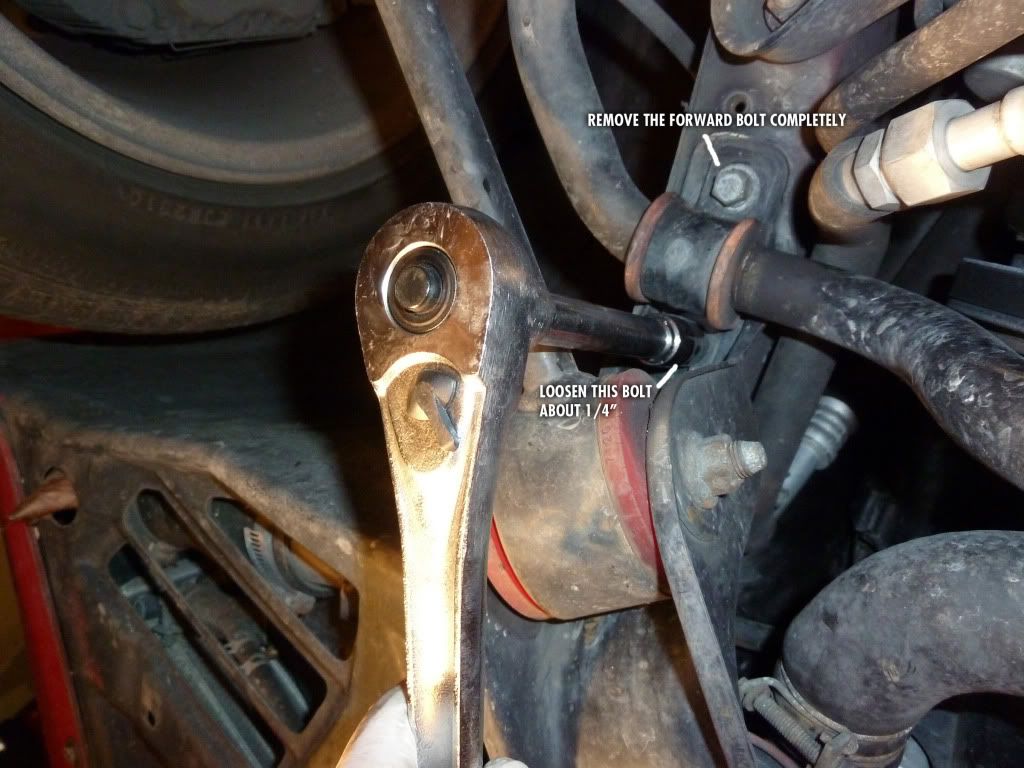
4. Now slide under the car head first. Use the 10 mm socket to remove the under shield screws. Then use the 14mm socket and the 6" extension and ratchet to remove the front sway bar bolts. You only need to remove the front bolts, and then loosen the rear sway bar bolts about 1/4" so that you can slide the sway bar fitting forward to disengage it and then slide it towards the rear of the car to give you more room to work.
[pic 307]
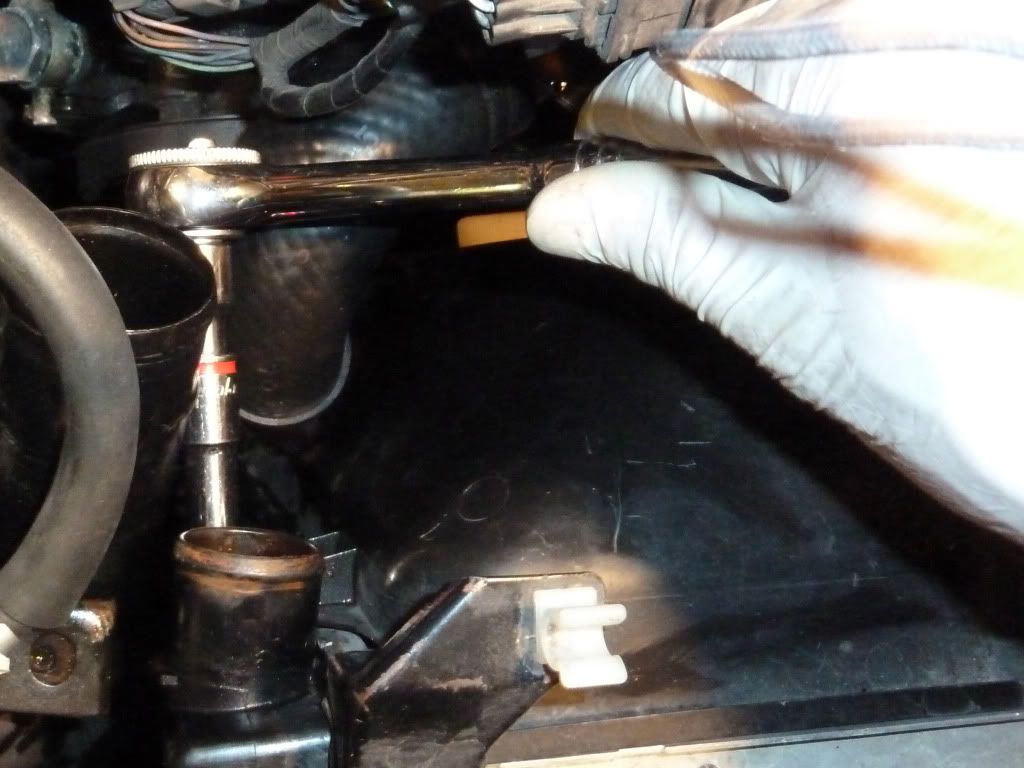
 5. Remove the black rounded lower fan guide that is attached to the radiator by unclipping the 3 clips. Pull out on the sides of the clips on the side to release them. Next, remove the lower 10mm screws in each corner of the fan guide attached to the radiator. Also remove the long radiator hose bracket on your right. Place your container below the center of your car, underneath the radiator hose connections to the water pipes on the engine. 6. Now move to the top of the car. Remove the short radiator hose (10mm, 8mm). A small amount of coolant will spill out. 7. Remove the top screws at each corner of the fan shield on the radiator using the 10mm deep socket and 1" extension. Be sure to unclip the small overflow hose on the right and catch the small hose bracket when you remove the screw. I tucked the hose in between the intake hoses to keep it out of the way. Remove the top two radiator brackets that hold the hood rod (10mm or phillips head). Now slide out the fan guide from the top by wiggling it and leaning it front to back to get it up and free from the fan blades. Remember the angle that you managed to do it because you will have to slide it back in that way.
[pic 308]
 8. Get a small rag handy. Then disconnect the large radiator hose (10mm, 8mm) from the lower water pipe on the engine. Coolant will spill out momentarily, and then continue to seep out. Stuff a rag tightly into the opening to reduce the flow, then put a baggie over the opening and secure with a rubber band which will slow the seeping considerably. However be prepared for it to continue to slowly seep for about 10 minutes and drip down into the container under the car. No biggie. Tie the hose you disconnected to the radiator filler neck on the right to keep it out of the way and to prevent coolant from draining out of your radiator through the hose.
[pic 310] 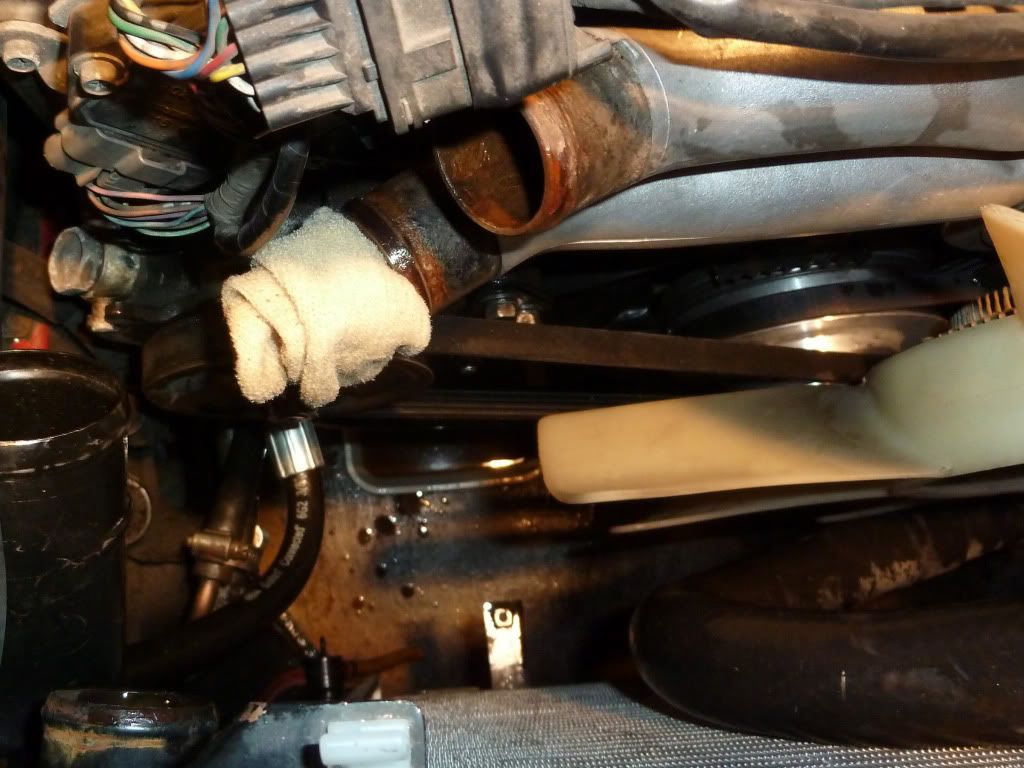
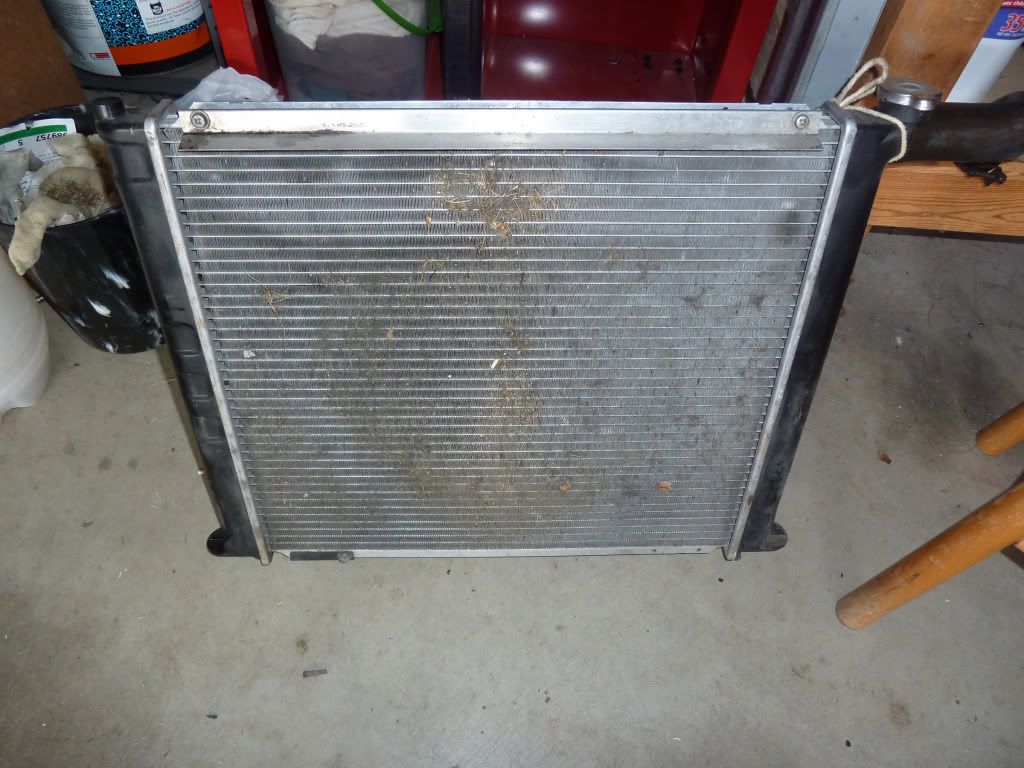
9. Lift the radiator out of the car. You will have to bend the long hose a little here and there so it doesn't get caught up in the fan, then shimmy the radiator left and right to get it to clear various obstacles. It's not too tough. Once again, try to remember the angle that you got it out because you'll have to put it back in the same way. Be sure that the two rubber donuts that the radiator pins at each bottom corner sit on do not fall off and roll away. Sometimes they stay stuck to the radiator momentarily but then fall off when you're not looking when you move the radiator. :-) Set the radiator aside. Might be a good time to clean it with a vacuum while you wait for the earlier water pipe seepage to stop if it hasn't already.
[pic 325]
10. Now place your container under the power steering pump. Have a rag/paper towel handy. Remove the top high pressure hose bolt (24mm, 6" or 12" extension and breaker bar if necessary) and prepare for fluid to seep out. Wipe up as best you can.
11. If you don't have a 90 - 93 TT you can skip ahead to step 12. Otherwise do this step. To allow room for a socket and ratchet to fit on the 24mm HICAS bolt you need to remove 3 hard line bracket bolts (10mm x 3) that hold the ps return lines. One is located next to the passenger side sway bar bolt holes and the other two are near the center of the car.
[pic 366]
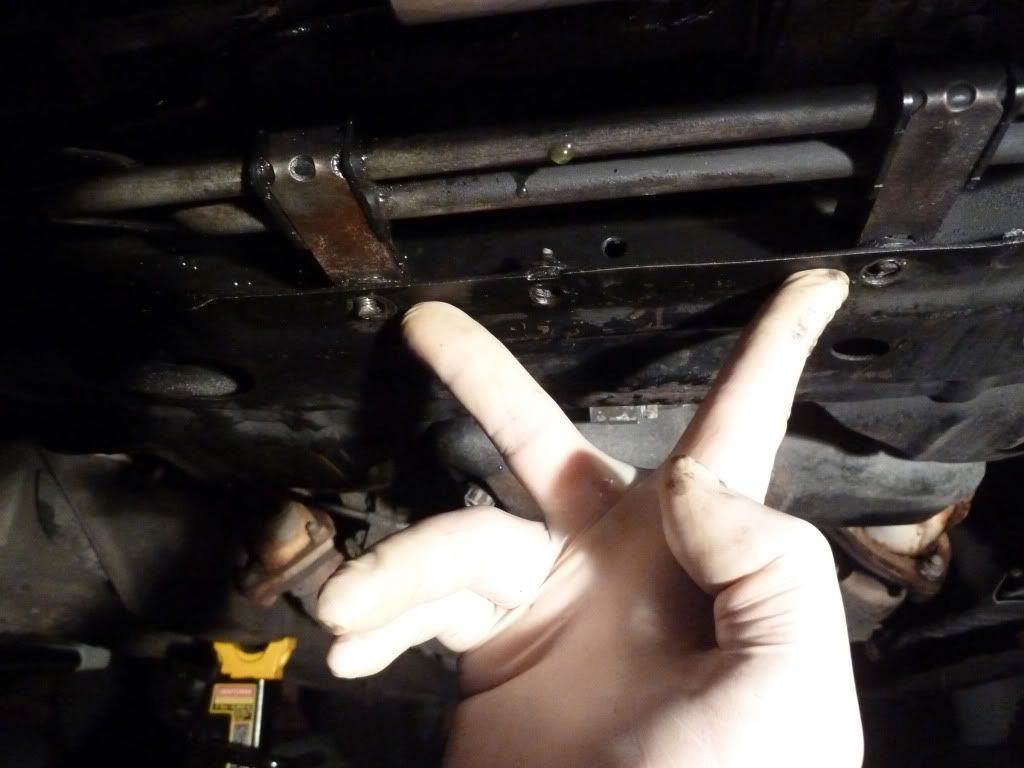 Once removed, this will allow you to move these lines so you can squeeze your socket and ratchet on the fitting to loosen.
[pic 364]

Adjust your container under the power steering pump to catch the fluid that will drip after you begin loosening and removing the 24mm bolt on the lower HICAS hose.
12. There are 3 bolts that need to be loosened on the power steering pump assembly so you can get the belt off it. The 14 mm pivot bolt which is behind the pump pulley at about the 2 o'clock position, the 12 mm slider bolt nut, and the 12 mm slider adjustment bolt. To access the pivot bolt you will need to rotate the pulley on the power steering pump so that you can use one of the holes in the pulley to access the bolt. To position the pulley, make sure the car is in neutral and parking brake on, then use the 27 mm socket on the crank bolt and rotate the crank bolt which will also rotate the power steering pulley. Rotate the access hole to line up with about the 2 o'clock position. You'll have to periodically use your finger to feel for the bolt head as you turn the pulley. Note: there is another pump bracket bolt at about the 4 o'clock position which is NOT the correct bolt to loosen so don't mess with this one. Once you've positioned the pulley appropriately to access it, use your ratchet and 14 mm socket to loosen the pivot bolt four or five turns.
[pic 311]
 13. Next loosen the 12 mm slider bolt nut a couple turns and then back out (turn counter clockwise) the 12 mm slider adjustment bolt almost all the way. Before doing this, take note of the number of threads showing out the end of the slider so that when you go to re-tighten the adjustment bolt later you will have an idea where you need to be. 14. Remove the 2 adjustor plate bracket bolts to the right of the pump as shown below. The plate will come off now, and may significantly free up the pump. If you can move it toward the engine enough to remove the belt, do it. If not, follow the instructions here: Use your right hand to position your pry bar against the alternator bracket or sway bar and then slightly pry the PS belt up and towards the front edge of the crank pulley. While you have the belt pried up you simultaneously turn the crank pulley with your left hand using the ratchet and 27mm socket with 1" extension on the crank bolt. Do this for several revolutions and this will essentially "walk the belt" off the pulley.
[pic 313]
**Tip: If you are rebuilding your pump or will need the pulley off your existing pump you should loosen the pulley bolt now before taking it off the car and trying to mess with doing that with the pump in a vise. To do that, put a 19mm socket and ratchet on the pulley bolt and turn counter clockwise while holding the pulley from turning with a ratchet and 6" extension and 14mm socket inserted in the pulley opening on the bolt at the 10 o'clock position. 15. Remove the pivot bolt. Now fully remove the hole bolt to release the bracket from the pump. Now the only thing holding the pump at this point is the fat suction hose connected on the rear that leads to the reservoir up top. Disconnect this hose (8mm) at the top where it connects to the reservoir and pull/slide it off. I used long needle nose pliers pressed on the edges of the hose to ease it off the reservoir nipple. More fluid will seep out.
[pic 330]
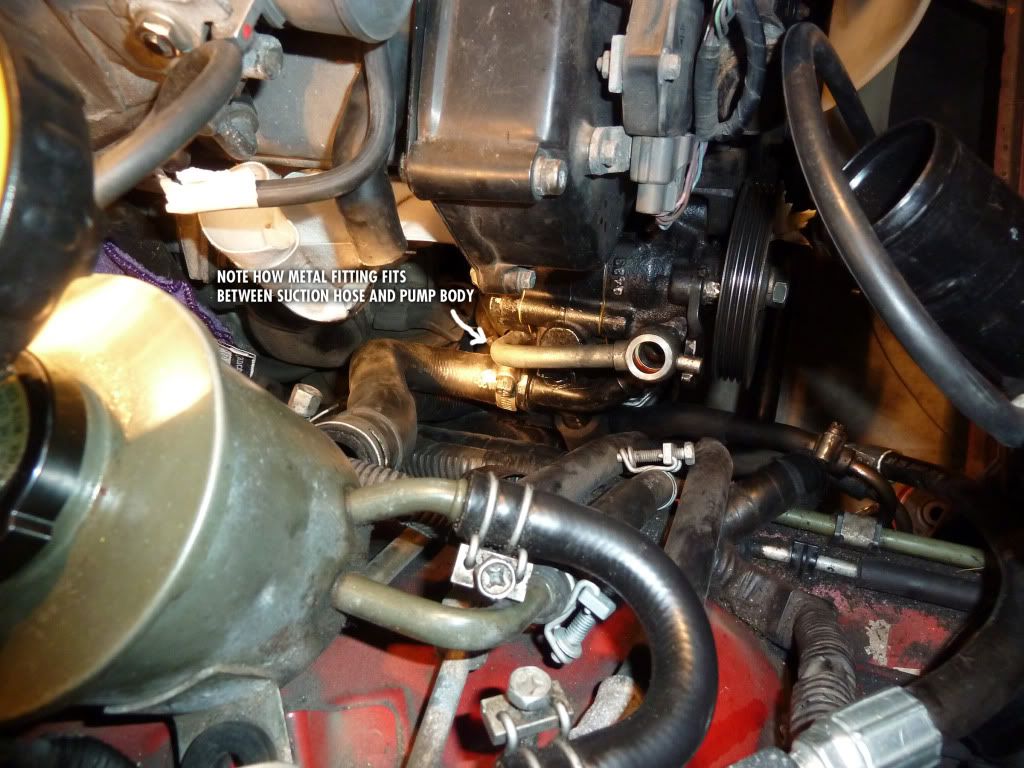
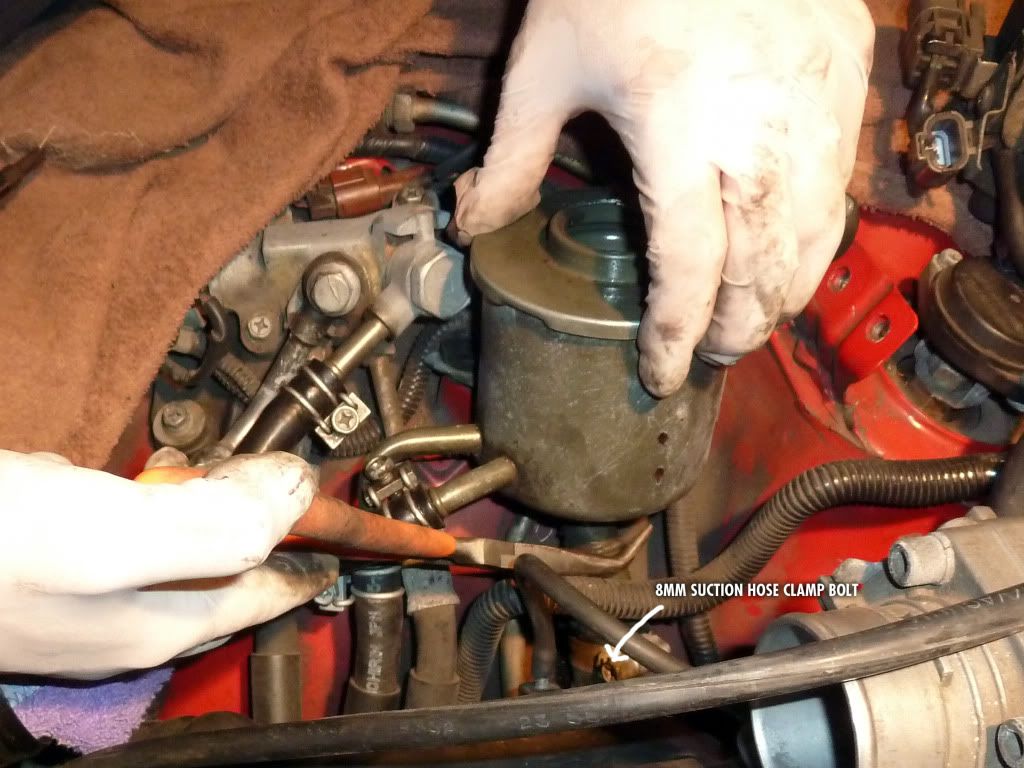 Unless you notice your connection point on the pump where the suction hose connects is leaking there is no need to disconnect this from the pump And in fact, leaving it on will help provide a guide as to the angle you need to attach it to your new pump. Or if you are rebuilding your pump and your hose is good, there is no need to remove it at all. (Note: I have previously replaced the suction hose and the other two hoses that attach to the pump so was not concerned about worn out hoses that might leak, but if you still have the original hoses or have concerns about them possibly leaking, NOW would be an excellent time to replace them. :-) 16. Now you will need to wiggle/rotate the pump down and out. This takes a little patience to work the pump free of the mounting bracket ears and suction hose out from its wedged position between the wiring harness and high pressure line fitting. Take note of its placement as you will need to install it in the same position, i.e. the metal High Pressure hose fitting falls between the suction hose and the pump body. If the metal fitting ends up outside the suction hose when you re-install it the fitting will not reach the pump!
[pic 362]
 Once you've got the pump free, you are now ready to replace the pump with your new one or rebuild your old one.
[pic 332]
 However, before you do this, it's a good idea to thoroughly clean and dry the hoses, alternator, and the entire area around the pump and mounting bracket with engine degreaser and your detail brushes to remove the baked on slimy gunk. Also having the brackets and fittings clean will make it easier to install the pump later. Plus cleaning your alternator of any wetness will help prolong its life too.
[pic 333]
 It's not absolutely necessary, but if you have some lithium grease handy you can also put a dab on the inside of the mounting bracket ears where the pump slides into it to help with re-installing the new pump. Installing the Power Steering Pump 17. Position yourself in front of the passenger headlight. Lean over and push and wiggle the pump back into place between the mounting bracket ears while threading the suction hose back up through the other harness lines. Once again, it will take some finagling, twisting, pushing and patience, like a lot of tasks on this job. Be sure that the metal fitting of the high pressure hose fits between the pump and the suction hose. Don't worry about connecting the top of the suction hose yet, just get it in the proper position that was mentioned and shown above in Step 16. After getting the hose in the proper position, continue to twist and push the pump into position between the ears. It will be a very tight fit but it will eventually fit between the ears, however once there it won't want to move. This will present a new set of issues when aligning the pivot bolt hole. 18. To address this, insert a phillips head screw driver in the pivot bolt hole. Use the length of the screw driver as a mini crow bar to help roughly shift and align the pivot bolt hole in the pump with the two holes in the mounting bracket. It probably won't want to line up completely. I used my mechanics mirror to look in the hole and could see the pump was a bit too high. Of course it refused to budge by simply pushing on it, so I placed my pry bar on the top center of the pump and then tapped it lightly with a rubber mallet. Then I tried to thread in the pivot bolt. It took me 4 or 5 minutes of tapping and nudging the pump in various directions and threading attempts before it lined up. Of course, then the rear hole in the bracket didn't line up so more nudging and tapping was required. Eventually it will fit. Once you get it threaded in, just loosely hand tighten the bolt for now because it needs to be loose for belt installation later. Put a piece of tape on the bolt head to remind you that it's not tightened.
[pic 359] 19. Attach the suction hose to reservoir and tighten the hose clamp. 20. Align High Pressure hose to pump fitting, inserting new copper washers above and below the fitting and thread in bolt. You may have to lift the pump up slightly with your right hand and thread the bolt with your left to get it lined up smoothly. Hand thread until tight, to ensure you don't cross thread the bolt. When positioned properly it should thread on very easily. Then use your extension, 24mm socket and torque wrench to tighten to 51 - 58 lbs. 21. If you have a TT put the accordion hose back on. It can be a little tricky. It will need to be "shortened" by compressing it slightly to force it back in place. Fit the non-accordion end on first. Take care that you have the hose lip fully over the connecting pipe and not bent as this will cause an air leak. Use a mechanic's mirror and a flashlight to view the underside if you need to. Note, if you wait to put the accordion pipe on after you have tightened the lower HICAS hose to the pump it is more difficult to attach the accordion pipe because you have to feed it under the tightly connected hose. 22. Install the "J pipe". If you have an NA or a 94 - 96TT you can skip ahead to Step 25. 23. Now move under the car and hold the HICAS hose fitting in your right hand and then use your left to thread the bolt with the two copper washers sandwiched on either side of the fitting into the pump. Hand tighten. Then use your torque wrench to tighten to 51 - 58 lbs. 24. Replace the 3 PS line bracket bolts that you had removed to gain space. 25. Put the PS pump adjustment bracket bolts back on (20 - 28 lbs.). Then put the hole bolt and adjustment screw in and loosely tighten. Walk the belt back on using the technique mentioned earlier. Once you've got the belt on, use your hands to feel along both pulleys to make sure the belt is fully on as it is supposed to be, then retighten the 2 bolts. Hand tighten the hole bolt nut first. Next tighten adjustment bolt until same number of threads is showing as before or perhaps one more as the belt might have stretched a bit. Once you've done that, then fully tighten the hole bolt nut (21 - 25 lbs, hand tight). 26. Torque pivot bolt to 20 -26lbs. 27. Make sure pulley bolt (19mm) is torqued to 40 - 50 lbs using the method mentioned in step 14 to hold pulley in place. 28. Replace the vacuum line bracket, vacuum tree and ASCD bracket, three PS reservoir bracket bolts, and associated small vacuum lines , in that order. Make sure the vacuum line tree still has the vacuum lines connected to the back of it. Sometimes they fall off when being moved. Attach long medium vacuum hose to nipple under intake pipe that leads from air filter/intercooler. 29. Drop in radiator, wiggling and angling in reverse of the way you removed it to get it to fit past the fan. Tighten the top brackets, then untie long hose and attach to water pipe. 30. Drop in fan guide over radiator (make sure center lip of guide goes on top of radiator ridge. Attach top screws in corners. Don't forget overflow hose bracket on right and to insert and connect the overflow hose afterwards. 31. Attach short radiator hose and tighten clamps. 32. Install large intake hose(s). 33. Move under car and screw in corner screws in fan guide and attach long hose bracket. Insert hose in bracket. Clip in circular lower guide. 34. Install sway bar bolts. Torque to 80 lbs. 35. Fill your PS reservoir with ATF fluid until it reaches the low mark on your dipstick. Leave lid off. 36. Leave car on jack stands and start car. Turn steering wheel slowly side to side until they lock and repeat 4 or 5 times. Then check ATF reservoir and top off to low point on dipstick again as necessary. Repeat turning wheels procedure until level stays constant. Do not over fill. 37. Lower your car. Remove radiator's left side air release plug using a phillips head screw driver. Then top off your radiator with 50/50 mix of distilled water and antifreeze to replace the coolant that spilled out. (mine lost almost 2 quarts) Then start the car and allow to come to operating temperature. Turn on heater for a minute or so to circulate coolant through heater core. Turn car off. 38. You're done and are ready to drive the car. However you should check both fluids the next morning when the engine is completely cold and top off as necessary. Coolant will probably need topped off. Make sure coolant level is at filler opening and also is at the High mark in the overflow reservoir when engine is cold. Hope this write up helps others save some time and headaches. doug8867
|


 300zx Power Steering Pump Removal and Installation -